How To Fold A Dress Shirt And Pack It Properly
In continuing our series on caring for your dress shirts, we’d like to provide some guidance on storing your shirts properly. Closets can get crammed quickly so proper storage will keep them looking good and extend the life of your favorite garments.
However, knowing what to store where, and when, is important and that’s particularly true when it comes to dress shirts.
Properly folding dress shirts starts with care and attention.
Your beautiful dress shirts deserve a little care and attention. A good shirt creates a good impression, so you don’t want yours to look creased and wrinkled.
Hanging is one of the most popular methods of storage and it works well – provided you have enough space.
Many choose to fold dress shirts and store them in drawers or on shelves and this method of storage is particularly useful if you have dress shirts in various fabrics for summer and winter.
It’s also important to know how to properly fold a dress shirt if you’re traveling – so we’ve created this easy-to-follow guide.

Tips to fold a dress shirt properly.
If you have your dress shirts cleaned by a professional laundry service they will come back neatly folded. We’re going to show you how to fold like a laundry service and we’ll even give you a few storage tips.

Preparation is key when folding dress shirts.
First of all, find a good flat surface where you have plenty of space to fold. A bed or a flat surface is ideal as you want a nice firm base where you can smooth the fabric easily.
Choose a wide work surface with enough space to lay your shirt flat and ensure that it’s clean and dry before you start. If you don’t have a suitable surface, a clean towel on the floor will work as a last resort.

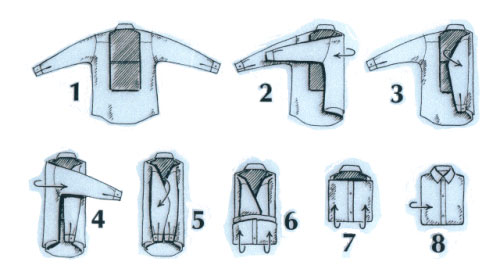
Folding shirts properly step one – Button up.
Now, take your freshly laundered shirt and ensure that all buttons, including the ones on the sleeves and any collar buttons, are fastened. This helps to keep folds crisp and precise and reduces wrinkling and creasing. Button up the top and bottom buttons, with just a few in between.
Folding shirts properly step two – Flatten out.
Give your shirt a shake to loosen any creases and lay it with the buttons facing down on your chosen flat surface. Now smooth the fabric so that it looks neat and fresh.
Using a solid wooden block or even a magazine works really well to help get the perfect fold. Ideally, something in an A4 size (or buying this) will do the trick and can easily be lifted out once you’ve completed the fold.
With enough practice, you eventually won’t need to use any assistance when folding.
Folding shirts properly step three – Start at the right side of the shirt.
Take the right arm and fold it straight across the back of your dress shirt. The cuff should end up at the seam of the left shoulder. Repeat this step with the left arm and then smooth out any tiny wrinkles.
Folding your shirts step 4 – The big fold.
Holding the sleeve and shirt together, fold the right side of your dress shirt into the center. Repeat with the left side of the shirt. If you’re folding a shirt with a back pleat, aim for the pleat. If not, aim for a spot at the center of the collar.
If you’ve done this correctly, you should see a kind of ‘v’ shape on the back of the shirt. Now, pull the tail and shoulder apart firmly to remove any wrinkles from the sides of the shirt.

The final step – Achieving a perfect finish on the folded shirt.
If you want a longer fold on your shirt, you can bring the tail of the shirt up to the collar. Or, for a shorter fold, simply fold in half lengthwise.

And finally…getting that perfectly folded dress shirt.
Now you’re ready to place your folded dress shirt on your shelf or in a drawer. Stack dress shirts neatly on top of each other. It’s best to keep stacks short; too much weight pressing down can cause creasing.
If you’re storing shirts on a shelf, you can add a shelf divider to ensure that your stack of shirts doesn’t topple over. Be sure to allow a little space for ventilation.
Here’s a short video from our friends at T.M. Lewin perfectly visualizing the steps we’ve mentioned above.


